If you have not separated an endodontic instrument then you haven’t done enough root canals.
These words were spoken to me by one of my mentors, Dr. Ken Blumberg many years ago when I was a general practice resident in Newark, NJ.
He was 100% right.
With that said, there are some things you can do to minimize instrument separation. I look forward to discussing some of those things in future posts, but I wanted to talk a little bit about what happens after an instrument is separated.
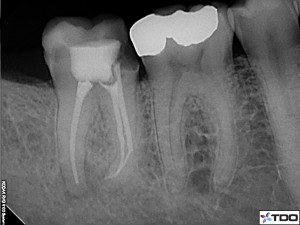
The following case is a good place to start. This patient had root canal treatment performed several years earlier. He was not informed that there was a separated instrument, and only after inspecting the postoperative xray at the time and questioning his dentist about it was he informed of the condition. Needless to say, he found it difficult to trust this dentist moving forward. This is one of the reasons he now sees one of my referring doctors.
This gentleman presented in acute pain and was acutely sensitive to percussion. In assessing the condition of this tooth, I had several concerns, and the presence of the separated instrument was certainly one of them. My preferred course of action when faced with a separated instrument is:
1. Bypass and remove the fragment using hand instruments
2. Use ultrasonic energy to loosen the instrument
3. Evaluate the symptoms and decide to leave the fragment
4. Surgical approach
If you look at the instrument fragment, it appears to be caught around a bend or in a merge and in the apical third no less. It is also on the mesial. Remember that last fact!
In this case any one of these options is viable. Although I don’t do a lot of mandibular second molar surgeries, they can be done. However, as is the case in nearly all retreatment cases, my goal was to achieve patency on all of the canal systems. Hopefully a byproduct of that is to reduce tissue pressure periapically and get the patient comfortable. We were able to achieve patency and placed calcium hydroxide at the conclusion of treatment.
At the second visit, the patient was asymptomatic. As patency had been achieved on all systems and I had been able to freely instrument and irrigate around the separated instrument, I felt it best to incorporate it into the filling material. So I chose door #3.
What’s interesting on this case is that there appears to be caries on the distal aspect of this tooth. This was not visible clinically, nor did it communicate with the pulp space. One of the benefits of caries removal dye is that it is highly visible under the microscope and leaves me with no uncertainty.
Closure of the mesial margin was a two step process. Initially, caries is removed and a resin composite buildup was placed. After the margin was created, the sectional matrix was reapplied and the contact was restored using resin composite. Because this is not a long term restoration, the contact closure was done solely to prevent the impaction of food interproximally. Although I will sometimes leave the margin exposed, the interproximal tissue was still unhappy and I felt that closing this contact would keep the patient more comfortable until they were seen for the next restorative visit.

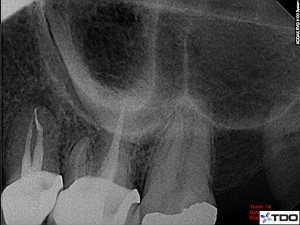
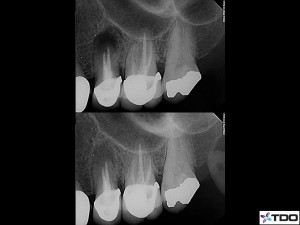
This time, I needed door #4. Severe toothache in the upper left quadrant. Extensive medical history including significant systemic disease involving the immune system. After multiple visits and every medicament I have in my office, the symptoms didn’t change appreciably over several months and the instrument would not budge. The patient continued to report having a constant, low-grade headache that seemed to emanate from the area of tooth #13. As you can see on the radiograph, the separated instrument appears to be stressed or bending, as if caught around a curve.
Despite my best efforts, I couldn’t get the file out. Only one option left. I decided to obturate the apical 5mm of the each canal with Brasseler BC Sealer. The idea was that following resection, the case would not require retroprep and root end filling.
Peek-a-boo!!

Postop, no more pain. Constant headache went away immediately.
4 months later, looks like an intact lamina dura, no?
Since removing or dealing with separated instruments is a part of my practice, there are some things I have learned and would like to share. Some relate to patient management and others to clincial judgment and technique.
1. The separation of an instrument within a root canal is (usually) NOT malpractice.
2. Not informing your patient about said instrument is a bad idea, not a practice builder and in many jurisdictions is considered malpractice. I’m not a lawyer, so note the careful wording.
3. Many instrument separations occur late in the root canal procedure. I think of this as similar to why so many car accidents happen near one’s home. We let our guard down, lose focus, and next thing you know…snap. It is important to remain focused throughout the entire procedure. This is also a benefit of multiple visit treatment. Less stress!
4. Do not force files. Using a limited number of instruments requires a great deal of skill. Most file sequences are specifically designed to allow you to safely and incrementally increase the size of the canals. Skipping steps and modifying the technique on the fly requires a great deal of skill and there is an inherent risk in doing so.
5. Beware of the m and m’s, mesials and merges. The mesial canals of lower molars and the mesiobuccal canal of upper molars are common places where files separate. There are frequently communications and merges in these canals. In addition, care must be taken to ensure that access allows reasonable access to these canal systems without putting undue coronal stress on the instruments.
6. Listen to your hand instruments. A canal that is stubborn as you open from a 10 to a 15 is likely not going to easily tolerate an F3 on the first pass. Initial rough preparation with handfiles gives you a preliminary map of the canal size and can help you avoid missteps in file selection.


